Always Coca-Cola

The fader-scene has seen some impressive innovations in the last decade or so. Better overall quality of components, light sensors used in faders (Stanton’s Focus Fader, Numark’s Infinity Fader etc.) and Rane came up with the magnetic non-contact fader. This video shows how you can use their faders wen you’re having a drink 🙂

It’s an old vid already, worth posting all the same as the Rane TTM56 is one of the most widely used turntablist mixers to date. All this cutting is making me thirsty haha.

Scratch Mixer Troubleshooting

There are several problems you can run into that relate to your mixer. Here I will discuss the most common ones that you might encounter as a (starting) turntablist.

(Don’t expect to find ways to hook up your mixer to your amp and things like that, that’s what manuals are for!)

The sound doesn’t seem to ‘cut’

Several reasons why the effect you’re trying to reach sounds more like a fade than a cut are described below.

X-fader curve

You should put this on the sharpest possible. Read more about curve-control here.

Non-scratch x-fader

Some mixers do not offer curve control but still come equipped with x-faders suitable for scratching. However, most mixers do not. If there’s no curve-control on your mixer chances are that you got a x-fader that’s not able to give you sharp cuts.

Fader-bleeding

When your x-fader is all the way to one side you should be hearing just one line-channel. However, sometimes you can still hear the other channel, especially when you slightly touch the fader. This phenomenon is called bleeding. It normally occurs after a lot of usage. However, if your mixer’s got a faulty x-fader ,or just a bad one, then it could occur after a few hours of scratching (even with a brand-new x-fader!).

There’s no real way of preventing this since it is mostly due to contact-parts that have worn out. On the other hand you should always be sure not to let dust and other crap pile up inside your x-fader since this could speed up the process. Use an old towel to cover your mixer when you are not using it and, if you can get your hand on some, use compressed air to blow dust out of your fader once in a while.

The fader doesn’t glide smoothly

If you feel your line- or x-fader doesn’t glide as smoothly anymore as it did when it was new, here is what to do.

Get your hands on some fader-friendly lube. Cali-lube will do, or some gun or sowing-machine oil. You cannot use any lube or, even worse, oil, since they are not made for fast moving parts and will simply mess up your mixer. WD40 will eat any plastic parts in your fader so don’t use that!

Using a lot of lube to smoothen the way your x-fader glides might seem a good idea at first but it’s not. Dust gets stuck on excessive lube and will only make your x-fader run shittier in the long run. If you really want to re-lube your fader make sure you get all the dust and old lube of the gliding parts (you might have to open up your fader for this). When it’s all clean apply a moderate amount of lube. Done.

Scratch Mixer Basics

Really simplistically speaking, at least regarding turntablism, the mixer is mainly used to turn the sound on and off. You can achieve this by using different faders or switches. Since most of the scratching techniques (link here) involve x-fader action, I will discuss the x-fader here.

X-fader use in scratching

A lot of scratches need the x-fader to be moved back and forth over the cut-in point. The sound goes on and off. This is true for Hamster as well as normal-style scratching. The hand you use to move the x-fader is commonly referred to as the fader-hand. Because the distance the x-fader has to travel back and forth is relatively small, it is obvious that you shouldn’t move your whole arm. For this wears out your arm-muscles pretty quickly. A technique adopted by many turntablist is the pinching technique.

Pinching technique

Position your thumb on one end of the fader and your fingers on the other end. Now you ‘pinch’ the fader between your fingers and thumb. This allows you to move the fader by flicking your wrist. At first this might feel awkward and maybe it doesn’t go that fast at all. This is because the muscles that move your wrist are normally not used to moving fast. This x-fader technique is called ‘pinching’-style.

Whether you pinch the fader with all of your fingers or just a few doesn’t matter, as long as you are able to direct your wrist movement to your fader. Don’t focus to much on the pinching, it’s ok if your fingers and thumb loose contact with the fader. The key thing to keep in mind is that your thumb and fingers should work together. Depending on the scratch-style you adopted you’ll flick your wrist in the other direction to create silences, or ‘clicks‘, with your fader.

If you want your x-fader skills to progress you should bare in mind that the trick to fast muscle movement is relaxation as opposed to tensioning. Try to use short burst of muscle movement to control the fader and let your wrist relax in between. This allows you to move the x-fader at greater speeds for a prolonged period of time.

Scratch Mixer Terminology

Depending on what kind of mixer you’ve got there can be a lot of buttons, switches and faders. Since it is impossible to describe all options that are available I will discuss the parts that are relevant to the turntablist.

Faders on your mixer

Something that you will find on every mixer are faders. Faders come in different sizes and shapes. On a battle-mixer you’ll mostly find 3 faders:

  • 2 line-faders (also called up-faders); these are placed vertically
  • 1 x-fader (cross-fader); this one is placed horizontally
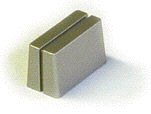
Fader knob

Fader knob

Because usage of especially the x-fader is much higher for the turntablist than for a normal DJ it is vital that the faders are durable. This is because wear and tear of faders occurs sooner when you’re scratching as opposed to normal mixing.

For a turntablist some models of faders are a pleasure to use whilst others simply do not suffice. Even amongst battle mixers and manufacturers the ‘feel’ of faders varies quite much. This is why ‘modding’ of faders has been done for ages already by turntablists. A few manufacturers have relized this and are now offering ‘high-end’ custom faders that can virtually be fitted into any mixer.

The Innofader and the Pro X Fade are amognst the popular ones in turntablist circles.
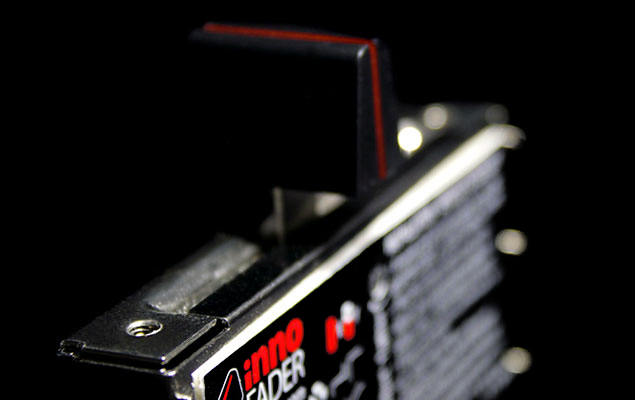
Innofader

Innofader

Pro X Fade

Pro X Fade

The X-fader (cross-fader)

The most important part of the mixer for a turntablist is the x-fader. The x-fader gets its name because of the fact that it can ‘cross’ two channels. The most striking difference between the line-faders and the x-fader is that the x-fader is placed horizontally instead of vertically. It allows you to manipulate the volume of the signals by moving the fader from left to right and vice versa.

A difference that is not so obvious lies in the way the x-fader treats the signals. A line-fader fades in a signal when you move it from bottom to top. This is not the case with the x-fader. If the x-fader is placed all the way to the left, the left line-channel (often channel 1) will be audible. To only hear the right line-channel you have to slide the x-fader all the way to the right (note: if your DJ-setup is Hamster-style this will be different!). When you place the x-fader in the middle you will hear both channels at equal volume. All positions in between the ones discussed above will fade one of the channels and leave the other one at highest volume (fig.1).
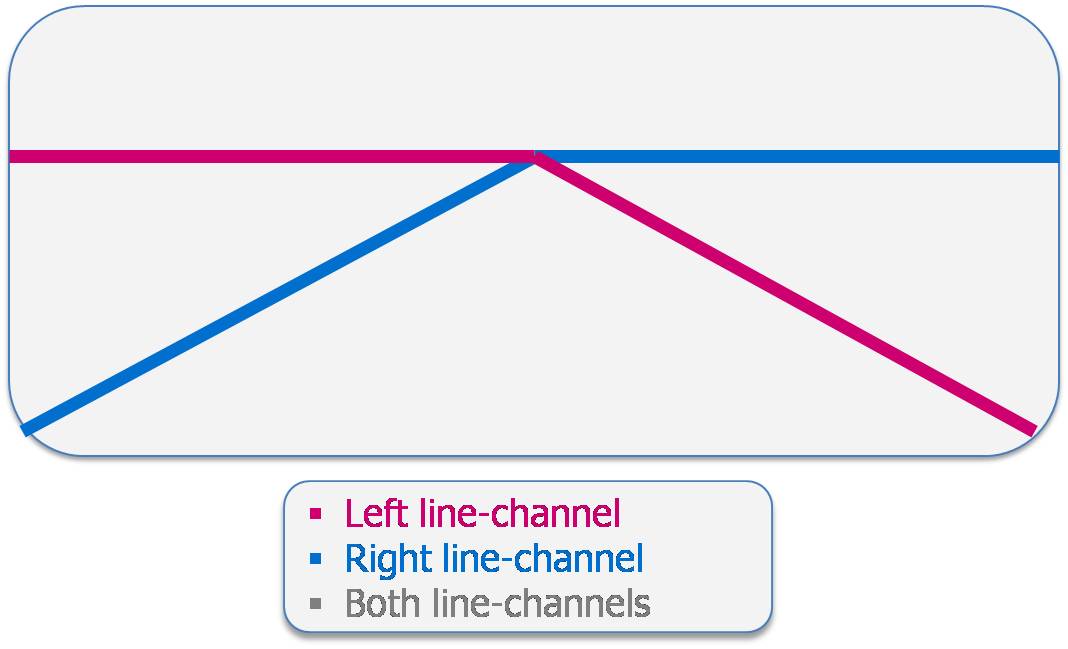
Figure 1 - Normal X-fader curve

Curve-control

Something that is a vital option on a mixer for a turntablist is ‘curve-control’ for the x-fader, and preferably for the line-faders too. The curve-control allows you to make the ‘fade’ really short. Ideally you will not even noticeably hear the fade but it will sound like the signal is suddenly there (fig.2). As can be seen in figure 2, a sharp curve makes both signals audible over a much bigger length on your x-fader. This is a side effect, the main thing is that the curve is as sharp as possible.
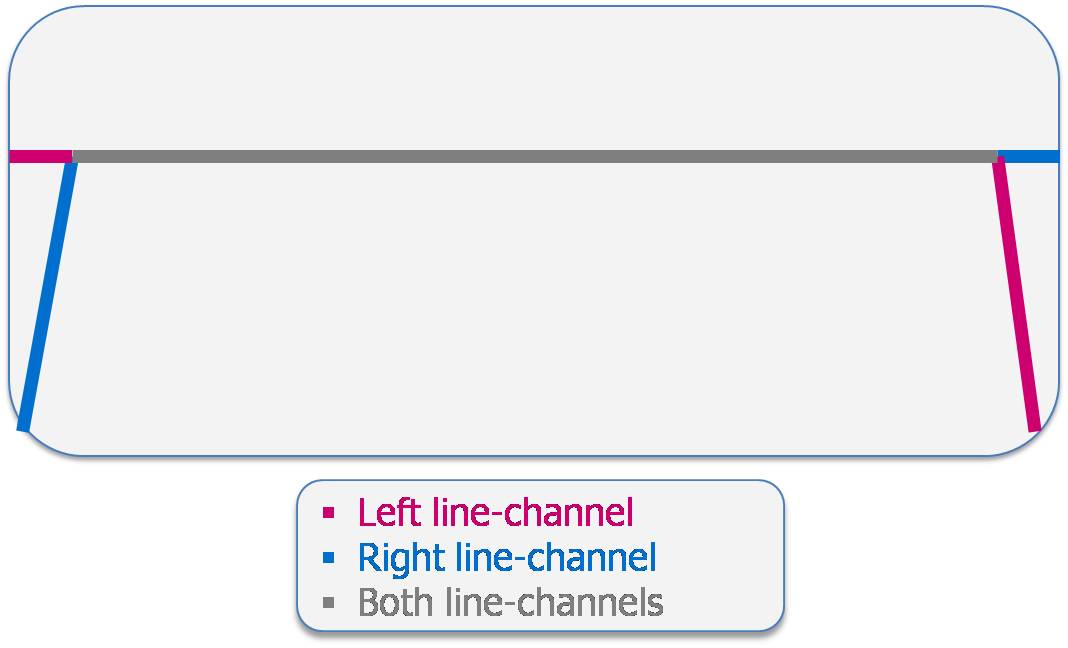
Figure 2 - Sharp X-fader curve

Figure 2 - Sharp X-fader curve

The cut-in point

The position of the x-fader under point B (fig.3) is referred to as the cut-in point of your x-fader. This is the point where the signal becomes audible. When using a normal curve-setting on your x-fader (fig.1) the travel-distance to get to this point is really long. To get good sounding scratches this distance should be as small as possible, that’s why your curve-setting should always be at its sharpest.
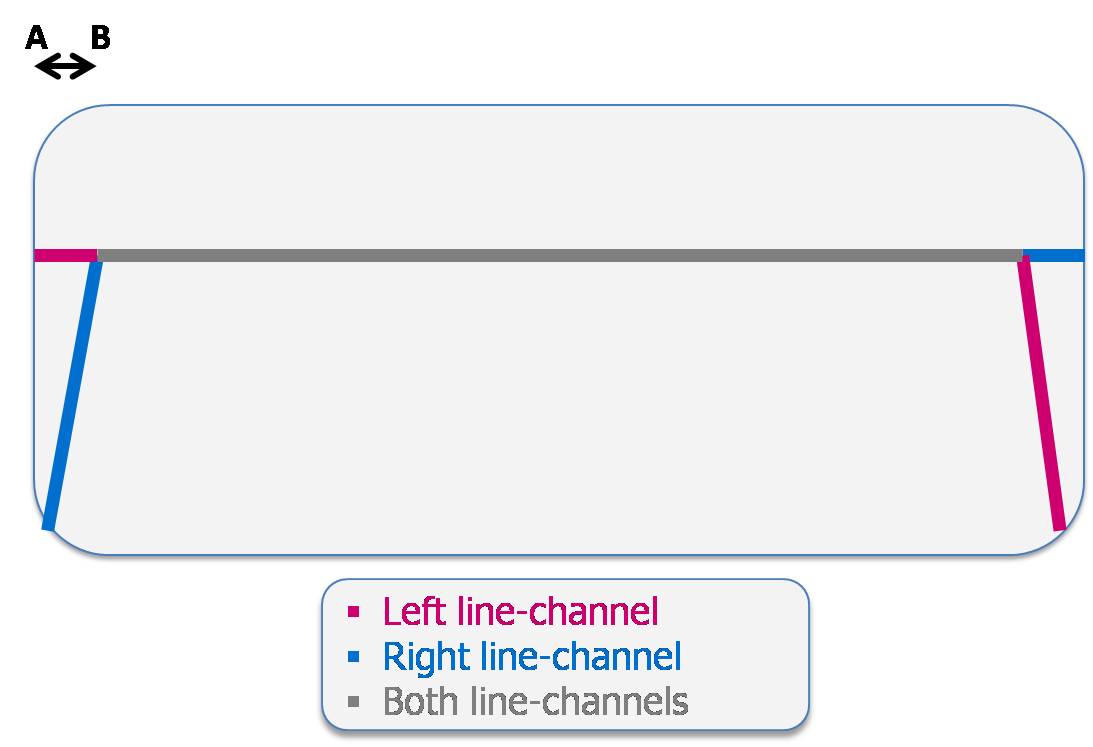
Figure 3 - Cut-in point

If your mixer doesn’t offer curve-adjust for your x-fader then normally the curve will be like the one shown in figure 1. This is often the case with ‘dance’ mixers. You can pull off some scratches with these but you’ll never reach a high ‘cut’-speed. That’s why, as a turntablist, it’s best to use a battle-mixer that offers curve-adjust.

Line-fader

Sometimes the line-fader will be used during scratching as well. Because a line-fader usually has a normal curve-setting you will need a separate curve-adjust for these faders. It depends on the type of mixer you’re using if there’s curve-adjust for the line-faders as well as the x-fader.

Fader reverse-switch

A lot of battle-mixers are able to reverse the ‘fade’ of the line- or x-fader. With a line-fader up will become down and vice versa. Similarly with the x-fader, left will become right and right will become left. The x-fader reverse switch is often referred to as the ‘Hamster-switch’. The scratching style of a turntablist derives from the way the x-fader gets used: ‘Normal-style’ or ‘Hamster-style.

Some DJ’s prefer to scratch Hamster-style because it allows you to ‘bounce’ the x-fader of the fader-slot with your fingers instead of your thumb.

If your mixer’s not equipped with a Hamster-switch you can still scratch Hamster-style by setting up your mixer Hamster-style.

Phono-line switch

This switches between the phono and the line input on your mixer. A turntable will always be connected to the phono input. The line input is for other devices such as CD-players. If there’s no signal coming in on your line input you can use the P/L switch for the same goal as you use your x-fader: cutting the sound. Some mixers offer a way to position this switch in 8 different directions so you can adjust the switching direction to your own liking.

The Battle Mixer

So what is a good mixer to use for scratching? Although a mixer needs less tuning than a turntable when you want to scratch, there are still a few things you should keep in mind.

Mixers come in all shapes and sizes but for turntablism it is best to use specialized models called ‘battle’ mixers. Some aren’t specifically called that way but are still used for the same purpose: turntablism.

A typical good turntablism (or battle-mixer) offers at least the following:

  • 2 line-faders with curve-adjust
  • A long-lasting x-fader with curve-adjust
  • A hamster-switch
  • 2 phono/line switches
  • 2-way Eq. adjust

In my opinion these are the bare essentials and should give you enough possibilities to start of with.

As with the turntable, for a good mixer you have to be willing to pay the cash as well! Most cheaper models do not offer curve-adjust on the faders. I have found that models that do not at least offer curve-adjust for the x-fader have a x-fader that is not suitable for scratching anyway.

Scratching Terminology

As I mentioned earlier, there are a few terms that are often misunderstood or interchanged. In this section I will try to explain them in a way that they make most sense.

Scratching

Moving a record back and forth under the stylus of a turntable. This can be done at various speeds. These movements can, but need not to be, combined with opening and closing a fader on your mixer to manipulate the volume of the outgoing sound. Since the combinations of these actions are infinite, possibilities are endless. Things like hand speed, movement and direction of movement (vinyl control), and the sound on the record itself also play a major role as to how the resulting scratch will sound.

Click

A short silence during a scratch, induced by a fader from the mixer, is commonly referred to as a ‘click’. The click (or multiple clicks) can be achieved by closing and opening the fader, often in a rapid motion.

Check the x-fader technique section for details on how to ‘click’ fast.

It is important to know that a ‘silence’ in a scratch is not necessarily created by fader-clicks. When the record changes direction there is a brief moment when no sound is fed thru the needle. This brief moment of silence is commonly referred to as a ‘ghost’ or ‘phantom’ click.

Another silence that can be utilized during scratching is the natural silence on the record just before (or after) a sample.

Cut

If one uses clicks to ‘cut’ the scratching motion into pieces, one would end up with several cuts from a scratch. Thus a cut is a piece from a scratch.

Often people use the phrase ‘give me some cuts’ or ‘cut up that record’. This is the same as saying ‘do some scratching’.

All that Scratching is making me itch

‘Scratching… what is it?’. This is a sentence that can be found on a lot of battle breaks. It’s a reference to the fact that most people who have never really tried to scratch might think that it is no more than ‘zigga-zigga’ on a turntable. However, all of those who have ever attempted to achieve the sounds created by the turntablist know that it is an artform indeed. It takes hours of practice, dedication and skill to be a turntablist.

Since the first scratch-movements of Grandwizard Theodore numerous techniques have been ‘invented’ by scratch-DJ’s. The essential techniques are explained in the Basic techniques section. The incorporation of the Turntablist Transcription Methodology in this site is useful for as well basic and advanced scratches. I have found that a lot of terms, definitions and explanations of techniques are often mixed up or misunderstood among turntablists. The TTM gives us a visual representation of the techniques so consensus can be reached.

I have to stress here that it takes lots and lots of practice (and the right gear) before you will master every single scratch-technique. Don’t be discouraged if you can’t get your scratches to sound the way you want them to. Stick with it, you didn’t learn to walk in one day (or a week for that matter) either.

Delayed 2-click Flare or Boomerang

I will be adding the basics of scratching soon, as previously available on skratchamental.com. In the meanwhile here is a vid I did a while back on the delayed 2-click flare.

What’s in a name

Some people refer to this scratch as the boomerang scratch. I have read numerous discussions on this and have really come to the conclusion that they are exactly the same. I would place it in the same box together with the ‘flare or orbit’ discussion haha, it’s endless. In the end it’s the scratch that matters, so here you go:

And here is the TTM for the delayed 2-click flare:

Delayed 2-click Flare

Delayed 2-click Flare

Turntablist Transcription Methodology

This section deals with turntablism notation. The Turntablist Transcription Methodology (TTM) is one of a few scratch-notation systems that have been invented. I have found that the TTM is best suitable as a visual aid when talking (or writing) about turntablism. I will not dwell upon it too much as it can get too complex. For a thorough explanation of the TTM visit http://www.ttmethod.com/

The basics of TTM

Figure 4 shows how time-signature can be read from the TTM staff. The staff used here consists of 4 beats, this time signature is typically used in hip-hop.

TTM Time Signature

FIgure 4 - TTM Time Signature

You can write down your scratch movements by drawing lines in the staff. A forward movement of the record is indicated by a line with an upward slope, a backward movement is indicated by a downward slope. Figure 5 shows two scratches which are done with a forward movement.

Figure 5 - TTM forward movement and different speeds

Figure 5 - TTM forward movement and different speeds

The sound being used can be written in the ‘sample line’. A 45 degrees slope of the drawn line indicates normal speed of the record and normal pitch of the sample being played. A less steep slope indicates slower movement and lower pitch (example in fig.5). Naturally a steeper slope stands for higher speed of the movement and higher pitch of the sound (example in fig.6).

Figure 6 -  TTM holding and backward movement

Figure 6 - TTM holding and backward movement

As illustrated in figure 6, a horizontal line stands for no record movement, in effect you hold the record. Figure 6 also shows a backwards movement, indicated by the downward slope.

As scratching doesn’t consist of record movement alone, you need a way to write down fader movement as well. Basically where the line is visible a sound can be heard, all the missing parts are nothing but silence (fig.7). These short silences, or clicks, are created by using a fader on the mixer.

FIgure 7 - TTM Click Notation

Figure 7 - TTM Click Notation

Figure 7 shows how small dots are used to indicate clicks. The 1st and the 2nd beat would sound exactly the same as the 3rd and the 4th one.

One aspect of scratching that is easier to grasp with visual aids is the concept of the ‘ghost’ click. This click occurs when the record changes direction. Figure 8 points out where this click can be found.

Figure 8 - TTM Ghost Click

Figure 8 - TTM Ghost Click

Transcribe your scratches and more

Above is a short introduction to Turntablist Transcription Methodology. If this has gotten you curious for more visit http://www.ttmethod.com/ and check out the rest of the terminology as well.

If you’re interested in transcribing your own scratches and cuts, it is worth taking a look at Johhny1Move’s Turntable Transciption Method String Language (TTSL). Through a nifty flash app you can create your own scratch notation. Here is an example I made, this is a combo of a crescent flare and a 3-click orbit:

Crescent Flare 3-Clicker Combo

Crescent Flare 3-Clicker Combo

Here’s a peak at the app:

Turntable Transcription String Language Flash Application

Turntable Transcription String Language Flash Application

If you want to contribute to the database or create some transcriptions of your own, get in touch with Johnny1Move. Alternatively hit me up at machiel (AT) skratchamental.com.

Site additions

I have converted more content and rewritten some parts of the old site. An interesting bit that is always useful (especially when preparing a battle-set) is on the usage of stickers on your vinyl.

Also have a look on how Kentaro uses his stickers below…